
DIY Gingerbread Photo Ornaments: A Simple, Messy, Magical Gift for Grandparents
- Anna Lynne

- Dec 16, 2025
- 4 min read
Embracing perfectly imperfect crafting this holiday season.
There is a lot of pressure during the holidays to make everything "Pinterest perfect." But if I’ve learned anything as a parent, it’s that the real magic usually happens in the messy, unplanned moments.
This year, we wanted to make something special for the grandparents. Homemade gifts for grandparents are always a hit; they love photos of the kids, and the kids love getting messy with art supplies. So, we decided to combine the two with these DIY gingerbread photo ornaments.
The goal wasn't perfection; it was connection. We turned on some Christmas music, sat at the table, and just made things together. If you’re looking for easy Christmas crafts for kids that cost almost nothing but time together, here is our loose "un-guide" to making these sweet little keepsakes.
The Setup
I started with a plan. (I always start with a plan, and my kids usually immediately derail it!)
I grabbed some thin chipboard/cardboard I had lying around from old packaging. I am all about improvising with what you already have. I fired up my Cricut and designed simple gingerbread men shapes with a circle cut out for the face.

I even got fancy and had the Cricut draw cute little icing outlines for bows and buttons for the kids to color in. Spoiler: they ignored the lines.
Making Your Own DIY Gingerbread Photo Ornaments
Don't treat this as a step-by-step guide. Treat this as permission to get creative with whatever you have in your house right now.
The Body
We used thin cardboard because it felt sturdy. If you have a Cricut machine, great! You can use the design above as inspiration.
No Cricut? No problem. Grab a gingerbread man cookie cutter to trace onto cardboard, or freehand draw one. Use scissors to cut it out and an X-Acto knife (parents only!) to cut out the face circle. It doesn't have to be perfectly symmetrical!
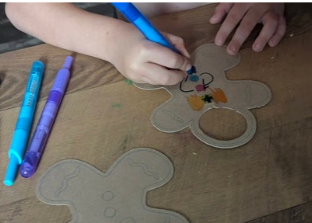
The Decorations
This is where their personalities really came out. My oldest did a great job, keeping mostly inside the lines I made but then got more creative. My youngest didn't even worry about the lines, he just scribbled different colors all around in pure joyful chaos.
And you know what? Both versions ended up perfect. They expressed exactly who my boys are at this age, which made them so much better than if I had forced them to be "neat."


The Gingerbread Photo Face
This was the most important part for me. I didn't want to just use a blurry selfie from my camera roll. I wanted to capture a true "moment in time", that classic, clear portrait that shows exactly what they look like right now.
That’s why I used Instant School Photos. Even though I run the business, I’m also a mom who wants those milestones captured! I snapped their photos quickly using our service, which gave me an edited, professional-looking image that I could resize and print right at home.
It is one of my favorite creative school photo ideas because it gets the picture off the wall and onto the tree. We taped the photos to the back of the cardboard so their smiles peeked through the hole, and suddenly, the gingerbread men had life.

Note: While the messy artwork is 100% the work of my own boys, I’ve covered their faces in this post. I believe in keeping my children's images private when it comes to business promotion, and we promise that same level of respect, privacy, and security for your family when you use our service.
Finishing Touches
To make sure these survive packed away in the ornament box for years to come, I ran ours through a laminator. I trimmed it and then, punched a hole in the top and thread some ribbon through for hanging.

Improvisation Station: If you don’t have a laminator, don't worry.
The Packing Tape Hack: You can "laminate" them using wide, clear packing tape carefully laid over the front and back, then trim the edges.
Leave it As Is: Honestly? Just leave them as cardboard. They might get a little beat up over the years, but that just shows they were well-loved.
Bonus Idea: The Handprint Ornament
We stuck to markers for our gingerbread men to keep the cleanup easy, but if you are break out the paints, here is a quick addition you can do in five minutes right before clean up.
The DIY Handprint
Just like the school photos capture their faces, a handprint captures exactly how little they are right now. We did ours in green to match the holiday vibe!
Step 1: Paint their palm (prepare for giggles, it tickles!).
Step 2: Press firmly onto a piece of white paper or cardstock.
Step 3: Once dry, cut around the handprint.
Step 4: Run it through the laminator (or use the packing tape hack!) just like the gingerbread men.

It took five extra minutes, but now we have their little high-fives frozen in time to hang on the tree next to their gingerbread smiles.
Simple is Magical
The kids were so proud of what they made, and I know their grandparents are going to cherish these funny, colorful, smiling little men on their tree.
It didn't cost much money, and it didn't follow the exact plan, but it was a lovely afternoon of holiday connection. Sometimes, simple really is magical.
P.S. If you want to make these but missed picture day this year, you can use Instant School Photos to grab that perfect "face in the hole" shot in just a few minutes!

